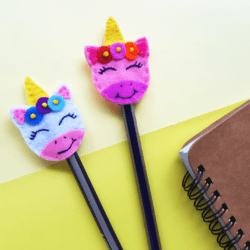
Unicorn Pen Topper Felt Craft
Ingredients
- Felt fabric
- Pencil or pen – for tracing the template
- Scissors
- Needle and thread
- Seed bead
Instructions
- Step 1: Select felts for the pen topper and trace the template patterns on them. The template includes 2 base patterns (unicorn head, front and back), 2 inner ear patterns (2 small triangular shapes), and 3 round shapes, 1 horn pattern and 1 semi circular shape (bottom part of the unicorn face).
- Step 2: Grab the 2 base patterns; the one with the horn layout is the back part and the one without the horn layout is the front part. Place the horn pattern on the horn layout of the back base, and place the 2 small triangles in the middle of the ear layouts of the front base. Stitch them with the base cutouts; make sure to use matching threads.
- Step 3: Take the 3 small round shapes and arrange them along the top end of the front base. Collect seed beads for the center of the flowers, or you can also use smaller round cutouts.
- Step 4: Stitch the round shapes on their arranged positions, on the front base. Stitching the center of each round shapes will do, no need to stitch around the sides.
- Step 5: Take the semi circular cutouts and place it on the bottom side of the front base, make sure to match the ends of the base with the semi circular cutout. Use a thin black marker pen to draw the face details of the unicorn, just add the eyes, nose and a smile.
- Step 6: Use black thread to stitch along the traced face details. I did simple back stitch.
- Step 7: Both base parts are ready, time to stitch them and make the pen topper.
- Step 8: Place the horn stitched base on the back side and placing the face stitched part on the front. Make sure that all sides of both base parts are matched. Keep about 1.5 cm of the felt unicorn open on the bottom middle end, stitch all around the sides.
- Once the stitching is complete, tie a knot, draw the needle inside the felt pattern and draw it back out again. Cut off extra thread and done!