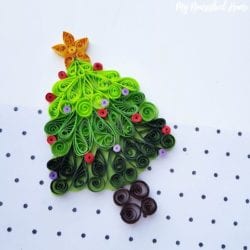
Quilled Christmas Tree Craft
Make this beautiful papercraft Christmas Tree with a short list of simple supplies. Perfect for beginners!
Equipment
- slotted quilling tool
Ingredients
- Paper quilling strips
- Green colored craft paper
- Slotted quilling tool
- Pencil
- Scissors
- glue
Instructions
- Select 3 different shades of green colored quilling strips for this craft. I’m using 6 inches long strips and 12 inches long strips to create the different quilled shapes for this craft.
- Take a strip and coil it with the help of the slotted quilling tool. Carefully take out the coiled strip from the tool and allow it loosen up freely.
- Press the loose coil on any point to form a teardrop shape. Glue the open end to secure the shape.
- Take a 12 inches long strip and fold it into half.
- Coil the 2 open ends of the folded strip. Coil all the way to the closed end (near the half fold part). This will form a heart shape.
- Take the teardrop shape formed in step 3 and place it inside the heart shape (between the 2 twirls of the quilled heart shape).
- Take a 6 inches long strip and coil the whole strip from any one end to form a twirl shape. Take a same colored quilled teardrop shape and attach it with the quilled twirl on its straight side. Create teardrops, heart shaped pieces with a teardrop inside and teardrop with a twirl attached to it.
- Grab more paper quilling strips and create more quilled shapes.
- Cut out a piece of green colored craft paper and grab all the quilled shapes.
- Let’s start from the top part of the tree. Grab 3 small teardrop shapes and attach them on the top side of the craft paper by keeping the pointy ends of the shapes facing upwards.
- Continue to attach the quilled shapes downward by keeping a tree shape in mind. For the next layer below the first quilled layer, I’ve attached a heart shape with a teardrop attached in the middle, teardrop with twirls attached on both sides and on the 2 outer sides, I’ve attached 2 teardrops.
- Grab different shaded quilled shapes for the third layer. Simply glue the quilled shapes downwards but forming a wider layer than the previous layer.
- For the fourth layer I used the darkest colored quilled shapes. You can add more layers if you want to. If you are confused about the pattern, you can place the different quilled shapes on the paper before gluing them.
- Cut out the craft paper around the quilled patterns outer border. Quill a 5 point star pattern using yellow colored quilling strips and attach it on the top end of the quilled tree.
- Quill 4 loose coils using brown colored quilling strips and attach them on the bottom side of the quilled tree by forming a square shape with the 4 brown loose coils. Also, create some tight coils from red and other bright colored strips. Attach the tight coils between the quilled shapes of the tree randomly to decorate the Christmas tree.