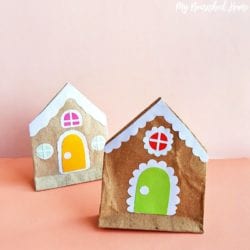
Gingerbread House Bag Craft
A Fun Holiday Paper Craft for Kids - use this Gingerbread House as a treat bag, gift bag, or as holiday mantle or table decor!
Equipment
- pair of scissors
Ingredients
- Brown paper
- Colored craft papers
- Pencil
- Scissors
- Craft glue
Instructions
- Cut out a rectangular piece from brown paper. Mine was 8.5 inches X 5 inches.
- Keeping 0.5 inches intact on either open ends of the brown paper, fold the 8 inches into half. Fold the 0.5 inch towards the inside and stick it with the other open end of the folded paper.
- Fold the paper up (1.5 inches or 2 inches) from any one of the open ends.
- Keeping the adjacent side of the folded up part flattened with the rest of the paper, open up the other side and flatten the 2 sides to form corners.
- Fold in the 2 open sides of the bottom part towards the middle and make sure that both sides overlap each other. Apply glue on the overlapped parts to secure the bottom side of the paper bag.
- Notice the 2 squares on both sides of the bottom part. Create a crease line on both sides of the bag by aligning the 2 opposite corners of the squares (using them as a guide to form perfect creases).
- Unfold the last 2 folds made in step 6.
- The paper bag is ready. Score the folds on both sides of the bag.
- To make the gingerbread house, you’ll have to fold the top open end of the bag from both corners and towards the middle. This will form a triangle top.
- Prepare needle and thread and also grab the cut out for the back side.
- Trace the template patterns on some colored craft papers and cut them out nicely. The template includes- roof, doors and windows.
- Use craft glue to attach the patterns cutouts on the paper bag. Attach the items on the plain side of the top folded paper bag, keeping the folds on the back side.
- One by one, attach the door and windows on the paper bag to complete the gingerbread house paper bag.
