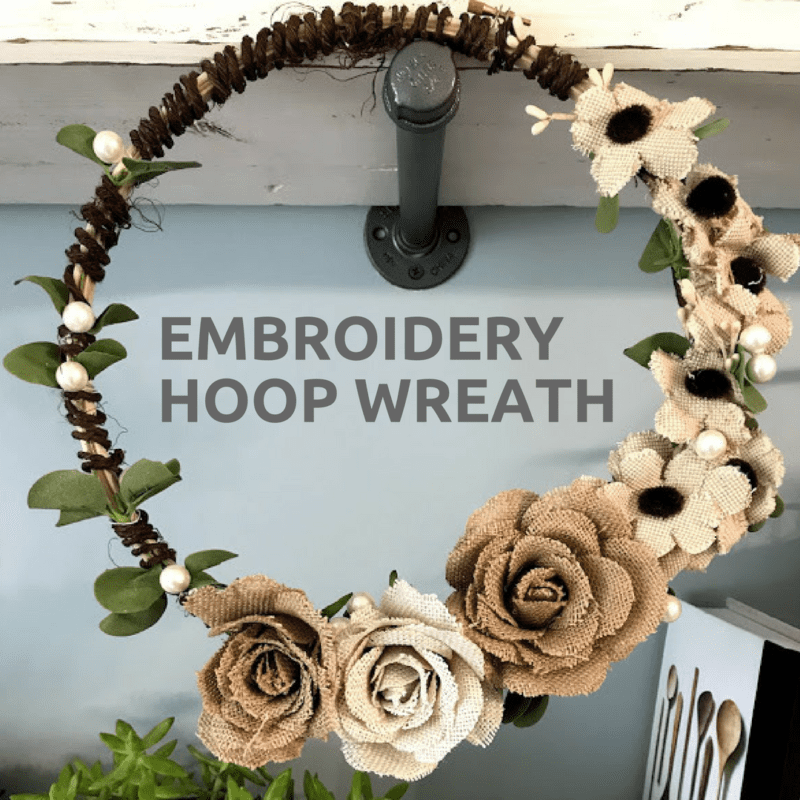
An Embroidery Hoop Wreath is a perfect simple statement piece for any room in your house, even the front door. They also make great gifts…
So I was super excited to hit the craft store and get supplies. Until I realize that simple did not actually mean cheap. Ouch. Not being an embroiderer… (is that a word?) I had no idea that craft stores sold large embroidery hoops for upwards of $14 a piece. Then when I went to the floral department, I recalled how expensive floral stems were.
I left the craft store sad… and embroidery hoopless. Considering I had never tried making a wreath this way, I wasn’t quite ready to drop 60 bucks on my experiment.
Thankfully, I am a crafting hard head. Figuring things out is as much fun for me as the actual making of things.
Any links in this post are affiliate links. If you buy through these links, I make a small commission and you pay no more for the products you receive.
I figured out a few ways to save some money and DIY my own Embroider Hoop Wreath:
Order your embroidery hoops an Amazon. So much cheaper… enough said.
You can also order your floral supplies on Amazon for less, like this grapevine craft wire.
While you can also order the flowers and embellishment online too, I actually found I preferred picking the exact things I wanted from the craft store. However! Skip the beautiful floral displays, and head to the aisle called “floral accents.” It is the collection of small embellishments that you would likely add to larger floral displays. For the purposes of an embroidery hoop wreath, the accent flowers are actually a perfect size. And the stems a shorter and you can pick out one flower at a time rather than whole stems full of blooms.
Oh… and the “floral accent” display is waaaaaaaay cheaper than the main floral aisles. You are welcome.
This hoop cost me under $30 instead of the $60 plus I had originally priced at the craft store.
How to make an embroidery hoop wreath
Supplies you need:
14-inch embroidery hoop (or whatever size fits your space)
3 large flowers for the hoop focal point
Enough floral accents to fill the right third of the wreath. (I used 2 accent pieces that had a few flowers on each)
3 stems of foliage that can be broken into several pieces
A package of embellishments for accent to create texture and color
Grapevine craft wire
Hot glue gun and glue sticks
Floral trimmers for clipping wires
Instructions:
- If you want to design your own embroidery hoop wreath, I find it helps to think of the circle in thirds. You will want to fill 1/3 of the hoop or 2/3rds of the hoop, but not the whole hoop with the floral arrangement.
- Trim all of your floral accents so that you can place them on the wreath. I like to trim the stems completely off the main florals. And create long strips on foliage to glue around the diameter of the wreath.
- Working from the base of the hoop, place your primary florals with a hot glue gun and hold them in place until they set. I like using 3 complimentary large flowers.
- Again using a hot glue gun, layer the foliage around the bottom third of the wreath. Add your accent florals up the right side, gluing as you go, and holding it in place until each piece is set.
- Take a look at how the wreath looks. Does it look balanced? Add foliage throughout the wreath to make it look full and textures.
- Add in embellishments for a special touch. (I like the pearls in this piece to create texture and break up the color.)
- Once the glue is dried and each piece is secure, begin winding the grapevine floral wire from the top moving left. Wrap heavily, but leave space to see the embroidery hoop underneath. When you reach the florals that are glued in place, wind carefully around them (hiding any wires and glue you used to secure them.) Continue wrapping until you reach the top of the wreath and trim. Hot glue both ends in place.
DIY Embroidery Hoop Wreath
I loved making this wreath so much. It is perfect for our front door as the fall weather approaches. Since making this one, we have been brainstorming several other ideas for wreaths with embroidery hoops so keep looking for more! And tag @iwishiwascrafty on Instagram so I can see your creations too!


Leave a Reply